백기선님의 Spring Web MVC 강의를 듣고 파일 업로드/다운로드 서버를 직접 만들어보는게 좋겠다고 생각했습니다.
직접 구현하면서 학습한 내용과 느꼈던 생각에 대해 정리하고자 합니다.
환경설정
기본적으로 스프링 부트를 사용하고 스프링 Web MVC를 사용합니다.
템플릿 엔진으로는 thymeleaf를 사용했습니다.
파일 요청을 처리하기 위한 스프링의 요소들
Multipart 요청을 받아서 파일을 업로드한다.
Multipart 요청으로 파일을 보내면 MultipartFile로 바인딩이 가능하다.
MultipartFile은 파일 업로드시 사용하는 MethodArgument이다.
MultipartFile는 DispatcherServlet안에 MultipartResolver가 등록되어있어야한다.
DispatcherServlet에서 Resolver등록
아래는 DispatcherServlet 내부에서 MultipartResolver를 등록하는 코드이다.
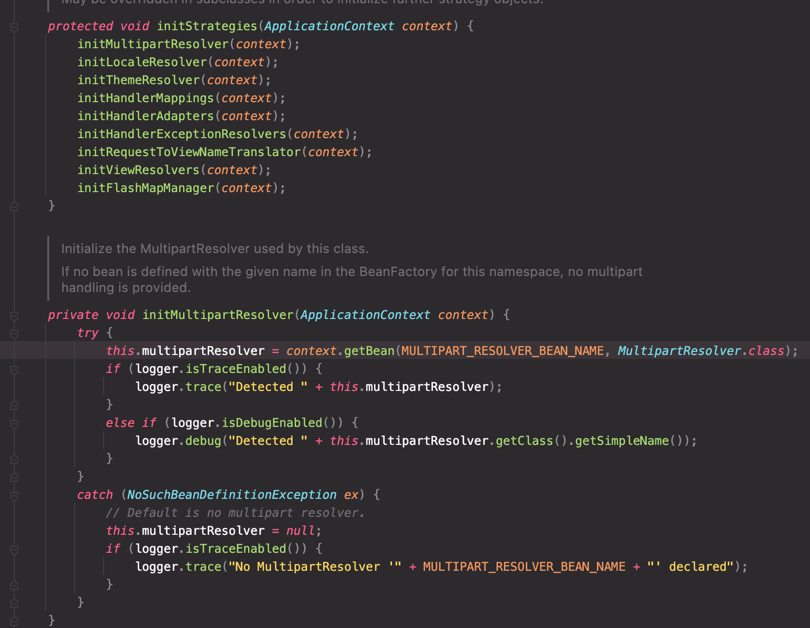
MultipartResolver는 스프링의 자동설정에 의해 등록된다. 이때 사용되는 자동설정 클래스가 MultipartAutoConfiguration 이다.

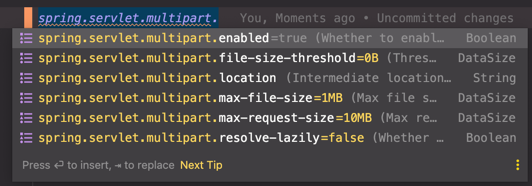
추가로 MultipartProperties는 Multipart 요청에 대한 설정을 할 수 있다.
(MultipartProperties 클래스를 참고하면 multipart 요청에 관한 설정에 어떤것을 할 수 있는지 알 수 있다.)
properties 파일에는 spring.servlet.multipart.설정옵션으로 설정이 가능하다.

Properties 같은 경우 다른 설정옵션들도 비슷한 클래스들이 존재할 것이다.
예를들면 DataSourceProperties 같은 클래스가 있다.
즉, MultipartProperties뿐만 아니라 다른 설정 옵션들이 어떤게 있는지에도 적용해볼 수 있다.
파일 업로드 기능 구현
아래는 파일 업로드를 위한 form이다.
파일을 입력으로 받고 Upload 버튼을 누르면 POST /files 로 요청을 보낸다.
<!DOCTYPE html>
<html lang="en">
<head>
    <meta charset="UTF-8">
    <title>File Upload Form</title>
</head>
<body>

<div th:if="${filename}">
    <h2 th:text="${filename}"/>
</div>

<form method="POST" enctype="multipart/form-data" action="#"
      th:action="@{/files}"> File: <input type="file" name="file"/>
    <input type="submit" value="Upload"/>
</form>

</body>
</html>
이제 파일 업로드 요청을 받을 수 있는 파일 서버를 구현한다.
@Controller
public class FileController {

    private final FileService fileService;

    public FileController(FileService fileService) {
        this.fileService = fileService;
    }

    // 파일 업로드 Form 페이지로 이동
    @GetMapping("/files")
    public String fileUploadForm(Model model) {
        return "files/index";
    }

    // 파일 업로드, fileService.fileUpload(file) 호출
    // MultipartFile 로 요청의 파일을 바인딩한다.
    // FlashAttribute로 리다이렉트 된곳에 사용하고 삭제되는 세션에 파일이름을 담아 함께 보낸다.
    @PostMapping("/files")
    public String fileUpload(@RequestBody MultipartFile file, RedirectAttributes attributes) {
        attributes.addFlashAttribute("filename", fileService.fileUpload(file));
        return "redirect:/files";
    }
}

@Service
public class FileService {

    // 파일이 저장되는 경로
    private static final String FILE_PATH = "src/main/resources/file";

    // 파일을 업로드
    public String fileUpload(MultipartFile file) {
        Path path = Paths.get(FILE_PATH).toAbsolutePath().normalize();
        String filename = file.getOriginalFilename();
        Path targetPath = path.resolve(filename).normalize();
        try {
            file.transferTo(targetPath);
        } catch (IOException e) {
            throw new IllegalArgumentException("파일 업로드에 실패했습니다.");
        }
        return filename;
    }
    // nomalize() 메서드 - 파일 경로에서 중복된 요소를 제거한다.
    // 많은 파일 시스템에서 "." 및 ".."는 현재 디렉토리와 상위 디렉토리를 나타내는 데 사용되는 특수 이름이다.
    // 만약 ".." 앞에 파일 경로가 있다면 중복된 요소로 판단한다. 다음 예시를 보자
    // "/file/image/.."
    // "/file"
    // 따라서 nomalize() 메서드는 /image/.. 가 중복된 요소라 판단, 해당 요소를 제거한다.
}
아래는 GET /files 로 요청했을 때의 파일 업로드 폼 화면이다.
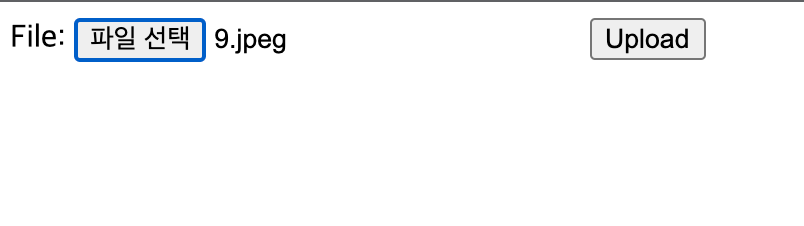
파일을 선택 후 Upload를 누르면 POST /files 로 요청을 보내고 GET /files로 Redirect 된다.
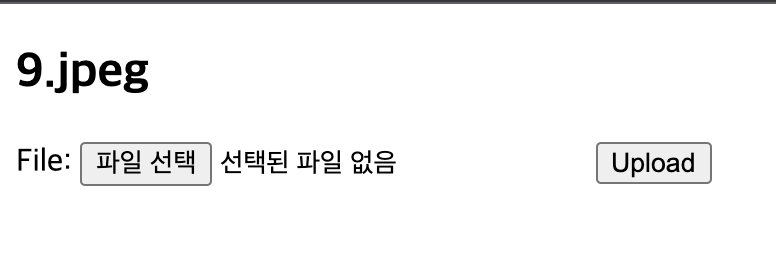
FlashAttribute에 담았던 파일이름을 뷰에서 보여준다.
파일 다운로드 기능 구현
파일 리소스 읽어오는법 : 스프링의 Resource Loader 사용하기
- 리소스를 읽어오는 기능을 제공
- 파일 시스템에서 읽어오기
- 클래스 패스에서 읽어오기
- URL로 읽어오기
- 상대/절대 경로로 읽어오기
파일 다운로드의 응답 헤더에 설정할 내용
- Content-Disposition : 사용자가 해당 파일을 다운받을 때 사용할 파일이름
- 헤더 값으로 다음의 값을 사용 "attachment; filename=[파일이름]" 여기서 [파일이름]은 사용자가 받는 파일의 이름이 된다.
- 예를들어 "attachment; filename=cat.jpeg" 라면 사용자는 cat.jpeg라는 이름으로 저장한다.
- Content-Type : 어떤 타입의 파일인가 ex) image/jpg
- Content-Length : 파일의 크기
파일의 MediaType을 알아내는 방법 (Content-Type에 사용할 수 있음)
Tika(공식 홈페이지)
참고로 티카 객체는 빈으로 등록해서도 사용이 가능하다.
Tika tika = new Tika();
String mediaType = tika.detect(file);
이제 파일 다운로드를 구현해보자.
아래는 파일 다운로드를 위한 폼 화면이다.
서버의 리소스 이름을 직접 입력해서 GET /file/download 로 요청을 보낸다.
<!DOCTYPE html>
<html lang="en">
<head>
    <meta charset="UTF-8">
    <title>File Download Form</title>
</head>
<body>

<form method="GET" action="#"
      th:action="@{/file/download}"> File: <input type="text" name="filename"/>
    <input type="submit" value="Download"/>
</form>

</body>
</html>
아래는 파일 다운로드를 위한 구현 코드다.
스프링의 ResourceLoader 를 사용해서 간편하게 리소스를 가져올 수 있다.
@Controller
public FileController {
    // ...파일 업로드 코드는 생략

    // 파일 다운로드 폼 (파일 이름을 입력해서 다운로드 받음)
    @GetMapping("/file")
    public String fileDownloadForm() {
        return "files/download";
    }

    // 파일 다운로드 api
    @GetMapping("/file/download")
    public ResponseEntity<Resource> fileDownload(@RequestParam String filename) throws IOException {
        Resource resource = fileService.fileDownload(filename);
        File file = resource.getFile();

        // Tika를 사용해서 파일의 MediaType을 알아낸다
        Tika tika = new Tika();
        String mediaType = tika.detect(file);

        // 파일 다운로드를 위한 헤더와 본문에 파일을 넣어서 응답
        return ResponseEntity.ok()
                .header(HttpHeaders.CONTENT_DISPOSITION, "attachment; filename:\"" + resource.getFilename() + "\"")
                .header(HttpHeaders.CONTENT_TYPE, mediaType)
                .header(HttpHeaders.CONTENT_LENGTH, String.valueOf(file.length()))
                .body(resource);
    }
}

@Service
public class FileService {
    private static final String FILE_DOWNLOAD_PATH = "classpath:/file/";

    // 파일 리소스를 가져오기 위한 ResourceLoader 가져오기 (스프링의 ResourceLoader)
    private final ResourceLoader resourceLoader;

    public FileService(ResourceLoader resourceLoader) {
        this.resourceLoader = resourceLoader;
    }

    // 파일 업로드 생략

    // 경로로 리소스를 찾아온다
    public Resource fileDownload(String filename) {
        return resourceLoader.getResource(FILE_DOWNLOAD_PATH + filename);
    }
}
아래는 GET /file 로 요청했을 때의 파일 다운로드 폼이다.

서버에 있는 리소스의 이름으로 다운로드가 가능하다.
현재는 파일의 확장자까지 써야 다운로드가 가능하게 구현되었다. 예시) test.jpeg
Resource 추상화
앞서 파일 다운로드에서 ResourceLoader 를 사용해서 Resource를 가져올 수 있었다.
스프링에서는 Resource를 추상화 시켰는데 이것은 java.net.URL을 추상화한 것이다.
기존의 자바에서는 classpath를 기준으로 파일을 가져오려면 호출이 조금 복잡했다.
// classpath를 구하려면 다음과 같은 방식을 거쳐야한다.
File(this.getClass().getProtectionDomain().getCodeSource().getLocation().getPath()).getAbsolutePath()
스프링에서 Resource를 추상화한 이유가 여기에 있다.
- classpath 기준으로 리소스를 읽어오는 기능 부재
- ServletContext를 기준으로 리소스를 읽어오는 기능 부재
- 새로운 핸들러를 등록하여 특별한 URL 접미사를 만들어 사용할 수는 있지만 구현이 복잡하고 편의성 메서드가 부족
스프링 내부 구현에 많이 사용되고 있는 인터페이스다.
예를들어 xml 파일을 가지고 애플리케이션 컨텍스트를 만들때 xml 파일을 가져오는 역할을 Resource 인터페이스 구현체의 객체가 담당한다.
new ClassPathXmlApplicationContext("xml이름.xml");
// 내부적으로 Resource가 명시한 파일이름을 찾아 리소스를 가져온다.'Spring' 카테고리의 다른 글
| [Spring Data] 도메인 이벤트 (AbstractAggregateRoot) (1) | 2022.02.01 |
|---|---|
| [Spring] Replication 적용기 - 2 (2) | 2021.10.25 |
| [Spring] Json 응답 gzip 압축하기 - 2 (1) | 2021.09.11 |
| [Spring] Json 응답 gzip 압축하기 - 1 (2) | 2021.09.10 |
| [Spring] @TransactionalEventListener (0) | 2021.08.25 |


댓글